
Are you tired of your tablescapes looking flat and uninspiring? Do you want to add a touch of rustic charm to your dining experience? Look no further! In this blog post, I’ll show you how to create a DIY Wood Riser Centerpiece that will elevate your tablescapes to a whole new level (pun intended).
Please note***This post contains affiliate links. If you make a purchase via one of these links I may receive a small commission from your purchase. This commission does not add any cost to you but helps me to continue to share new products and ideas with you. Thank y'all for always being so supportive!!
What You'll Need:
- Wood (10 1/2"W x 29"L Hardwood such as Pine or Reclaimed wood)
- Risers (Premade wood candle cups)
- E6000 Glue
- 15/16 Wood boring Drill bit
- Safety Glasses
- Taper Candles
- Museum Wax (optional)
Step 1: Prep Wood (if Needed)
Before you start, make sure your wood is clean and smooth. Sand away any rough edges or splinters. If using reclaimed or rustic wood, remember to leave some of the character and charm of the time worn wood! My piece of wood was slightly bowed so I made sure to use the concave side for the top of the centerpiece.

Step 2: Mark Candle Holes
Measure and mark the spots where you want your candles to go. For this centerpiece I found the center which was 5 1/2" then spaced the candle holes in an alternating pattern of 3 offset rows starting and ending 2 1/2" from the edge of the board.

If you'd like to follow the pattern I used, I have a free printable template for newsletter subscribers then can be downloaded here.
You can also get creative with the arrangement - symmetrical, asymmetrical, or even random. It's your centerpiece, so let your imagination run wild!
Step 3: Drill Candle Holes
Now it's time to bring out the power tools! Use a 15/16" wood boring drill bit. This size most closely matches the diameter of most standard taper candles and LED tapers. Carefully drill the holes. Make sure to keep a steady hand and go slow to avoid any mishaps. Always remember to wear eye shields or safety goggles. Safety first, folks! Remember to stop drilling ~1 1/2" deep hole to prevent drilling through the wood completely.

Step 4: Glue Leg Risers
Take your leg risers and apply glue to one end. Attach them to the bottom of your wood piece, making sure they are evenly spaced. These risers will give your centerpiece the height it needs to stand out (literally and metaphorically). I glued the candle cups ~1/4" from the edge of the board.


Step 5: Add Candles
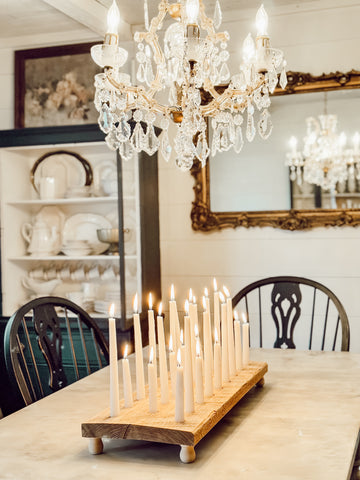
Finally, it's time to add the candles! Place them in the pre-drilled holes and make sure they are secure. Museum Wax is the best way to secure the taper candles into the holes to ensure a secure, straight fit!


Then, light them up and watch as your DIY Wood Riser Centerpiece transforms your table into a cozy, inviting space.
***Remember*** never leave a candle burning unattended and consider substituting LED battery operated candles for increased safety.

Now that you have your beautiful centerpiece, let's talk about its versatility. This masterpiece isn't just limited to being a candle holder. It can also double as a serving board or a seasonal centerpiece. Talk about getting more bang for your buck!


So, the next time you're hosting a dinner party or just want to add a touch of charm to your everyday meals, whip out your DIY Wood Riser Centerpiece and watch as your guests marvel at your creativity. It's time to elevate your tablescapes and take your dining experience to new heights!
If you love this piece but don't have the option to DIY it, you can BUY it! My friend Jennifer from Birchlane by Jennifer is selling her handmade version of this centerpiece. You can head to her website and purchase one of her beautiful creations here.
If you’d like to see a short video with up close views of this riser on Instagram you can check it out here. I would love to see your DIY Wood Riser creations! Happy DIYing friends!
